R1200GS Front Engine Cover Corrosion
See HERE for some photographs of more areas to keep an eye on for corrosion.
It seems that BMW R1200GS motorcycles suffer some quality issues with the finish of BMW motorcycles in general not being up to the standards of old. Have a look at this recent thread on the ukGSer forum:
BMW Corrosion problem refused under warranty
…and you’ll find a lot more discussions on the subject by searching terms such as ‘corrosion’ and ‘rust’ 😉
R1200GS Front Engine Cover Corrosion
Scroll down for Corroded R1200GS Front Engine Cover Repair & Painting
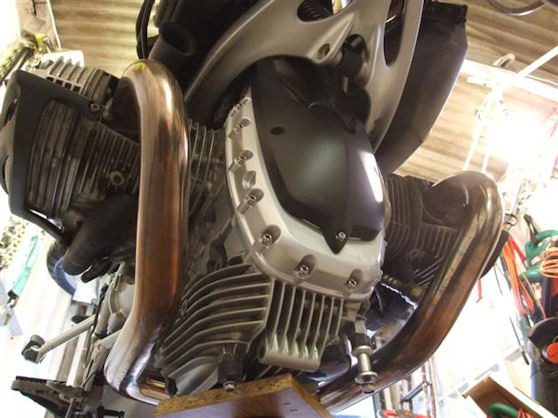
This is a common and much discussed problem (search forums such as ukGSer.com and ADVRider.com;-) that’s affected BMW R1200GS’s from 2004 to date (I say to date but I don’t know if BMW have finally done something about this ‘fault’ with the new 2010 R1200 series engines). Front engine casing corrosion blights the whole R1200 series of BMW motorcycles, R1200RT, R1200S etc. not just the R1200GS.
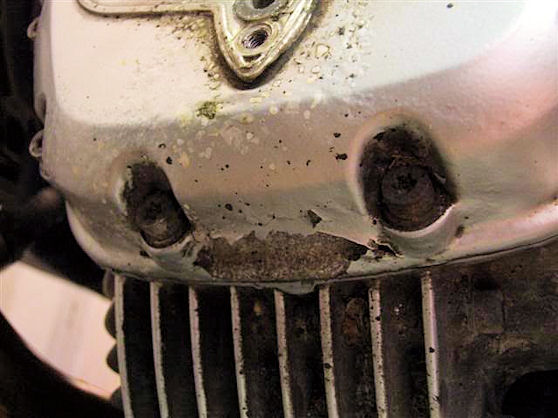
Here’s an example of what I’m talking about – corroded front engine cover on my 2005 R1200GS, a well looked after (pampered!) GS just outside warranty at the time (BMW will replace corroded engine covers FOC within the Warranty period). I had quite a fight with BMW Customer Services which eventually resulted in them covering parts cost and 50% labour for the replacement.

R1200GS front engine cover corrosion – poor design, bare aluminium/alloy, poor paint coating = guaranteed corrosion! Just a few months later and I removed the black plastic belt cover to check the state of the replacement engine cover…

I’ve coated the whole ‘at risk’ area in Waxoyl (alternatively use ACF50) and have removed the foam rubber ‘sound deadening pad’ that sits within the black plastic belt cover (and traps dirt, road salt and moisture!) now to hopefully halt the corroding process but will keep a close eye!
Top TIP: If it’s still in place (many BMW Dealers ditch it!;-) remove the foam rubber ‘sound deadening’ pad – no noticeable effect on engine noise :shrug: …….this is a major contributor to the corrosion problem 😉

Prevention:
- Remove the sound deadening pad if installed
- Remove the black plastic belt cover occasionally to remove accumulated dirt, road salt etc
- Coat vulnerable areas beneath the black plastic cover in Waxoyl or ACF50
Corroded R1200GS Front Engine Cover Repair & Painting
To get the best results you’d need to remove the engine cover (BMW refer to ‘gear case cover’) but doing that is a pretty big job. You would have to drain the engine oil and to get the casing off, remove the crankshaft pulley that drives the alternator belt (not easy without a special tool to hold it while you undo the large nut – final torque 140 Nm;-) The cover should then pull forward with both bearings still in the cover (crankshaft and timing gear) provided you’ve undone all the bolts around the cover! You would need to replace the oil seal in front of the timing cover bearing before reassembly to be on the safe side. Belt pulley to crankshaft M22 x 1.5 Initial torque, 40 Nm Final torque, 140 Nm
 | Belt cover (black plastic) to engine 5 screws (M5 x 16) – torque 5 Nm |
 | Bearing cap, front auxiliary shaft on 4 bolts (M6 x 20) – torque 8 Nm |
 | Front engine cover (gearcase cover) 16 of (M6 x 30) – torque 8 Nm |
So, repair and repaint in situ it is then 🙂
What you’ll need:
- Paint Stripper (Nitromors does the job well)
- ‘Wet & Dry’ fine grade sandpapers
- Acid Etch Primer (e.g. from Halfords – U-POL Etch Primer) NB: Acid etch primers give better adhesion to aluminium, ordinary primer will not bond permanently to the aluminium surface 😉
- Wurth clear lacquer, Wurth silver alloy wheel paint
- Stainless Steel Replacement Bolt kit (optional)

‘Wurth German Alloy Silver Wheel Paint Lacquer’ topped off with the same company’s clear lacquer gives a paint finish that is pretty close to the BMW factory original finish and it seems pretty durable. One source of the paint is Performance Motor Care
R1200GS Front Engine Casing Repair & Painting
by ukGSer Phil ‘the beer hunter’ Dec2009
Winter’s here so it’s time to do something about my flakey engine casing on my 1200GS!
I’m in no rush so I’m taking my time.
I’ve ordered Wurth paint & lacquer so I can’t really get stuck in before that arrives. There’s a set of A4 marine grade stainless bolts on the way too.
Day 1:
Assessed the situation.

Removed the crashbars & sump plate. (AndyW: I found that I can remove the black plastic belt cover without removing crashbars, may depend on brand, I have Hepco & Becker bars. Removal may be best for ‘space’ depending on how big a paint job you have to do)

Made a start removing loose paint.

….some of which came off in large flakes!

Remove the 12 lowermost securing bolts from the engine casing (or as many as required for your repair job). I replaced all the original items with stainless steel replacement bolts. The bolts around the casing are M6 x 30 (make sure you ask for Allen headed set-screws i.e threaded right up to the head).
TIP: Shaw Stainless Steel Fasteners do replacement bolt / fixing kits for the R1200GS and many other BMW motorcycles.
Day 2:
Take the paint back some more and clean.
I didn’t have to take the front wheel out but I wanted to replace the tyre so now seemed like a good time and it did make life easier with more space to work in.
Made a start stripping back the paintwork. (Nitromors, £3.98 – B&Q )
I’ll do this in stages because it’s very boring and I want to do a decent job (and great care is required with the paint stripper!;-).
I’m just applying nitromors in small areas with a small brush & slowly working around the casing paying attention to removing all the paint around the mounting holes. The bolts are removed of course.

I realised today that all the weight is over the front so it won’t balance on the mainstand without some support under the front. (note jack under engine, axle stand under front axle and DRZ wheels on the pillion area.)

Still waiting for the paint and lacquer to arrive so I’ll finish off the stripping another day.
While I was stripping the paint I only removed 1 engine cover fixing bolt at a time and worked a small area to achieve a decent job. I found if I concentrated on little areas I got a better result. (When I came to spraying I removed the lower bolts in the visable area but kept a few upper bolts in situ).
Thanks to ‘Easyrider5258’ for the inspiration, info via PM and giving me a standard of preparation to aim for:
Easyrider5258’s 1200RT

Day 3:
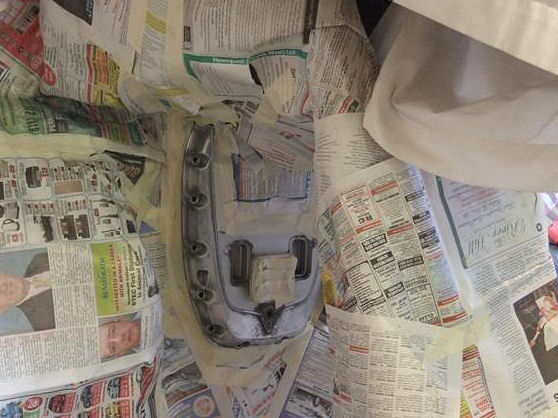
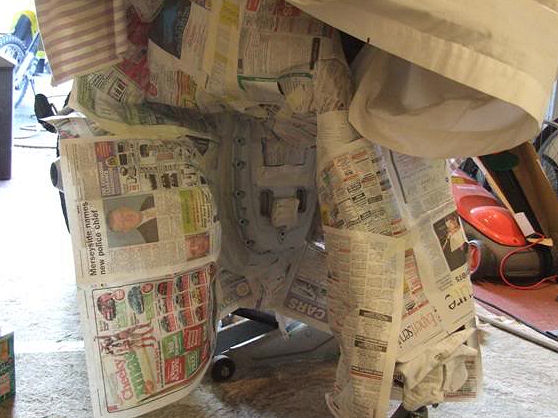
Stripped all the paint from the final visible area. Roughed up with some wet & dry fine sandpaper and cleaned. Ran the bike for a while to warm things up. Masked everything up.
Primed, painted and lacquered. (next three photos)
I spent a little over £35 on acid etch primer, paint & lacquer but only used 2 coats of primer and 3 or 4 coats of paint / lacquer

As soon as I peeled off the newspaper and masking tape I was impressed with the results 🙂

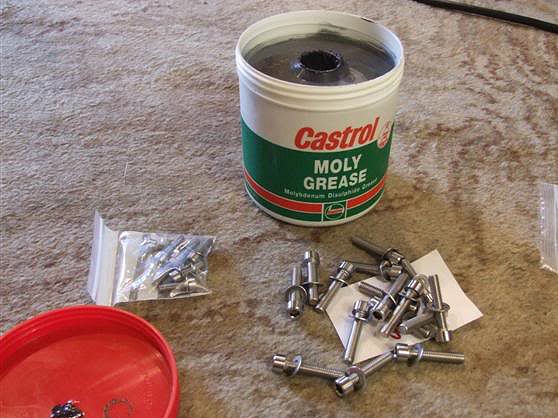
Greased up the new stainless bolts and threw it all back together.
CARE: Greasing the bolts could result in over tightening due to reduced friction – personally [AndyW] I would assemble dry, torque to correct tightness and then spray ACF50 around the bolt heads to seal (once your new paint has had a few days to properly cure;-) Can’t find any reference in the Manual 🙁


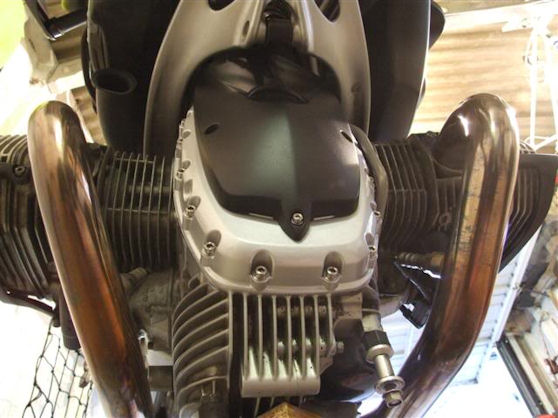

I’m very pleased indeed!!….from this..
to this…
RESULT!! 🙂
Castrol Moly Grease is great but any Ceramic Grease will do the job nicely.
Great job, did you take all the bolts out of the casing when you sprayed it?
Great detail, thanks. I’m about to do the same – mine’s a lot worse, the bike was used for commuting along a motorway all year for several years. I hope it looks like that when I’ve done.
Great article! I want to do the same, but I can’t identify the spray with the same color you used.
Can you please tell me the color code that Wurth spray had?
Here you go: https://amzn.to/3cMEQ2G
Thank you very much.
Hello, the link below has expired! Please please can you help me and tell me the code. I appreciate it.
Where did you but the stainless steel screw kit from? Thanks
What a great result, a winter job for me to the same, thanks for sharing.
Try “Tef Gel” or “Duralac” on your fasteners especially when using stainless one as they can “ pick up” and easily bind when tightening or mores the case undoing! I’ve worked in the marine industry for 30+ years and had great results with these. Never use a copper based paste on stainless and alloy if possible as you are introducing an another metal to the mix.