BMW R1200GS Auxiliary Removable Fuel Tank Installation
BMW R1200GS MKII Auxiliary Fuel Tank (Removable) Installation
By Mark Raybould 21Aug2010 (check out Marl’s website “the engineering emporium”😉
Update 09Sep2010:
BMW R1200GS Mk.2 Auxiliary Fuel Tank – Modification to Fuel Route
INTRODUCTION
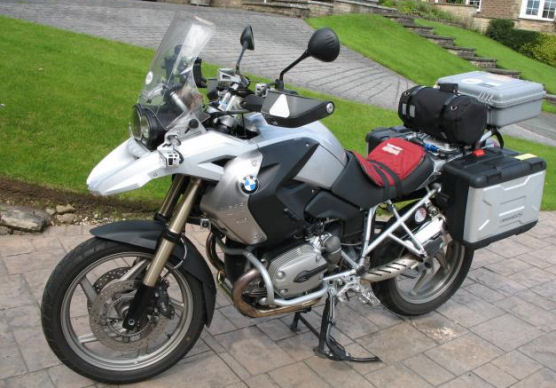
At 173cms (5ft8ins) a GSA was not really an option for me so I bought a new factory lowered suspension GS Mk.2 which suits me just right and I love every minute riding it all over the place. My only wish is that for a non-stoppable BMW the tank capacity of 20 litres is not sufficient if go anywhere anytime is to be practical. Travelling in the remoter areas of the UK fuel stations become a hit and miss affair with the ever decreasing number of petrol stations giving way to the large supermarkets hidden away in redevelopment urban areas and not on the main arterial roads. Fitting a GSA tank of 33 litres might seem straight forward but it does have its drawbacks such as dealer trade-in values, costs of tank, additional side panels and protection bars, and hearsay of the recalibration of the ECU with respect to the displayed fuel tank levels. The alternative approach to fitting a larger main tank, is to fit an auxiliary fuel tank. I also made a ‘Blue Peter’ model out of cardboard for the tank’s installation and size, in order to assess its impact on the bike. So here goes…
DESIGN BRIEF
I set out some guidelines to keep everything in perspective.
??? The R1200GS Mk.2 to remain a standard and type approved motorcycle
??? The installation would meet the Iron Butt Association (IBA) requirements
??? Only use fuel approved components
??? Increase the comfortable range from 200 miles to 350 miles by adding about 10+ litres
??? To be able to remove the aux tank installation within seconds and replace the pillion seat
??? To use readily available components – alloy tank to save weight
??? Adopt the Keep It Simple philosophy throughout
SOLUTION OPTIONS
The challenge is, ‘How to install an auxiliary fuel tank and transfer fuel into the main tank’? Three options have been considered.
??? A gravity feed system – where the main tank level drops below the aux tank level
??? A manual hand pump system – pumping fuel from the aux tank to the main tank
??? An electrical pumped system – transferring fuel from the aux tank to the main tank
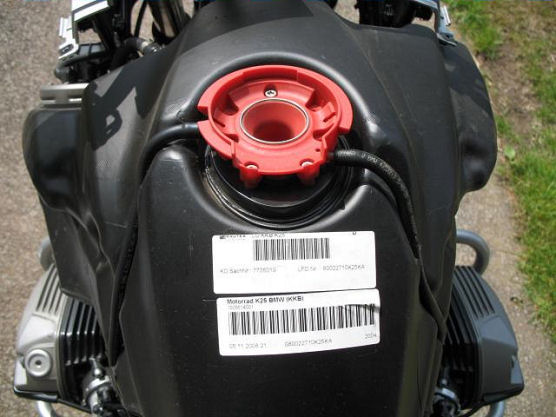
A gravity feed system was my first choice but had to be disregarded due to the Mk.2’s fuel tank not having two access plates, normally, one on the right hand side (RHS) and another on the left hand side (LHS). The LHS plate houses all the fuel injection and filter bits and pieces and should not be tampered with. On MK.2s the tank does not have an access plate on the RHS. Earlier tanks with an RHS access panel would have allowed an elbow connector to be fitted for a gravity system. I am glad I did an initial tank survey, which then led to a rethink.
My survey identified two tubes attached to the top of the main tank. The LHS tube is the fuel overflow pipe, checked by blowing up the tube with the fuel filler cap closed and no air or fuel will enter the main tank. But the RHS tube is the main tank vent, checked by blowing up the tube with the fuel filler cap closed and the tank pressurises. Blow up the RHS tube with the filler cap open and the tank does not pressurise, air flows in and so will fuel. Fuel will be uploaded through the tank vent with an appropriate manual pump and the swapping over of non-drip fuel-safe connectors.
Using an electrical pump with Option 2, adds to the complexity and for the safe operation around fuel under pressure, relief valves and by-pass fuel routes, and additional electrical circuitry. Increased maintenance and reliability comes into question. I may return to this choice in the future.
SOLUTION OVERVIEW
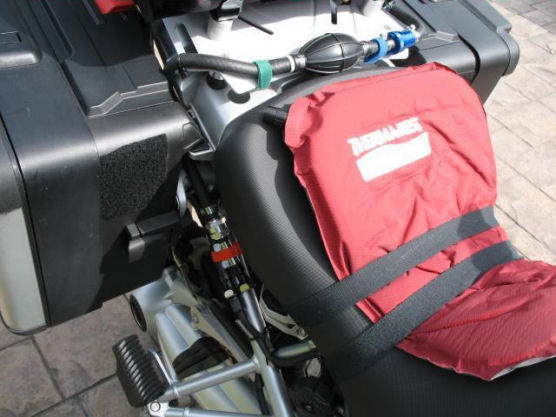
The choice of tank was made easy. Various sizes of Tour Tanks have been engineered to be installed onto many different makes and models of motorcycles. They are a proven solution with Tour Tank providing a full installation kit of parts if needed. A Tour Tank (3US Galls/11 litres) with roll over valve, grounding tab and cut-off valve, securely fitted to a Wunderlich luggage plate locked in the pillion position. Fuel is delivered to the main tank through the tank’s vent tube, switched by physically swapping non-drip fuel connectors between the normal vent line and a fuel line from the aux tank. Fuel is transferred from aux tank to main tank using a marine approved fuel bulb hand pump with an additional non-return valve to increase pumping efficiency. To transfer 11 litres of fuel will take 11 minutes (a kitchen sink test). After fuel transfer, the main tank vent will be reconnected and the fuel filler cap closed. During fuel transfer the bike is stationery and the main tank filler cap will be marginally open. Earthing of the aux tank will be to the main chassis of the bike. In addition to the internal baffle in the Tour Tank, fuel tank filler foam can be added as used in performance on and off road vehicles to prevent sloshing about of the fuel. The Tour Tank is metal, a fuel isolator valve is fitted close to the tank and the tank has a rollover valve to prevent any spillage.
SOLUTION SCHEMATIC (A picture says a thousand words:-)

SUPPLIERS
Nippy Normans for Wunderlich pillion luggage plate – Part No. 8500267
Tour Tank, USA for tanks and the main accessory parts
Demon Tweeks for fuel cut-off valve and hose fittings
Simpson Supplies for NRV for non-return valves Your local marine chandler for fuel hand priming pumps
Your local plumbers merchant for PTFE tape
Your local electronic store for cable ties
and Halfords for Velcro ties
Tour Tank USA aux fuel tank kit
OTHER SUPPLIERS OF FUEL SYSTEM ACCESSORIES
Goodridge Hose and Fittings – another source of fuel pipe fittings
Earl’s Performance Products – many fuel related parts
DISCLAIMER
Do not undertake any of this work unless you are knowledgeable and competent to select and install fuel carrying components in a secure and safe manner. This is a record of my installation of a Tour Tank to my R1200GS Mk2 2009. Remember, handling fuel in confined spaces is VERY DANGEROUS.
WATCH YOUR THREADS AND PIPE DIAMETERS
BSP is British Standard Pipe thread. (parallel thread and 57deg pitch)
NPT is National Pipe Taper. (tapered thread and 60deg pitch)
Inside pipe diameters can be 6mm (1/4inch) and/or 8mm (5/16inch).
Outside pipe diameters (od) can be up to 14mm for an inside diameter (id) pipe of 8mm.
ALWAYS use either PTFE tape or LocTite 567 on threads to prevent leaky joints. ALWAYS use hose clips on barb and push-on fittings.
4.55 Litres = I Imperial Gallon, 3.79 Litres = 1 US Gallon
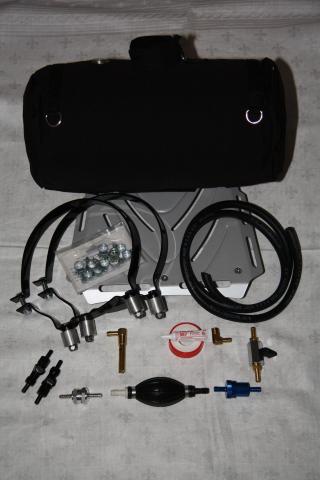
PARTS LIST
| Item | Description | Supplier | Comment |
| 1 | 3 Gal(US)Tour Tank DLX (8×16), 1/4NPT Threaded Outlet, Brackets, Cap, Internal Baffle | Tour Tank | Tour Tank require a diagram of your tank’s fittings. Calculated capacity 12 lit. Delivery 3 weeks. (approx) |
| 2 | Tank Rollover Valve | Tour Tank | |
| 3 | Grounding Tab | Tour Tank | |
| 4 | Aluminium Mounting Bushes (4) 1inch x 1inch | Tour Tank | 1inch x 1.5 inches is a better size |
| 5 | Heavy Duty Black Nylon Cover for 8×16 tank | Tour Tank | |
| 6 | Aluminium Fuel Filter Bronze element ¼-5/16 hose | Tour Tank | |
| 7 | LocTite 567 | Tour Tank | |
| 8 | Brass Elbow 5/16 Barb | Tour Tank | |
| 9 | 4feet fuel hose ¼ Barb | Tour Tank | For vent systems |
| 10 | Non-return valve 6mm Barb | Simpson Supplies | Lochmaddy, North Uist |
| 11 | Fuel Valve 1/4BSP- 8mm Barb | Demon Tweeks | |
| 12 | Hose clips 14mm | Demon Tweeks | Qty 10 |
| 13 | Hose clips 10mm | Demon Tweeks | Qty 2 |
| 14 | Fuel connectors (Non-drip) | Demon Tweeks | Bike-It quick release (Qty 2) |
| 15 | Marine fuel primer hand pump | Local chandler | As used on Outboard Motor fuel systems |
| 16 | PTFE Tape | LocaL plumbers merchant | |
| 17 | Spare | ||
| 18 | Tie wraps/cable ties/Velcro ties | Maplins/Rapid Electronics/Halfords | Or local electronic store |
| 19 | Foam tank filler balls | Demon Tweeks | Optional |
| 20 | Wunderlich Luggage Plate Part No. 8500267 | Nippy Normans | |
| 21 | Earthing cable – tank to chassis | Maplins/Rapid Electronics | Or local electronic/electrical store |
COST OF ALL PARTS
My Total spend has been £467 + £39 for VAT Import Duty (July 2010)
INSTALLATION REVIEW
Four holes were drilled in the base-plate and an access hole for the fuel outlet elbow.
Mounting bushes need to be taller (1×1.5) and removes the requirement to cut an access hole in the base plate.
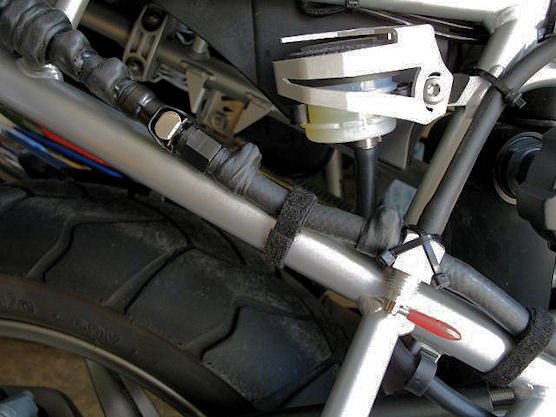
A circlip was added to the vent tube at the main tank access point to prevent any slight pressure blow-off of the vent tube when transferring fuel from aux to main tank.
The tank securing bands were very springy and needed longer bolts (80mm) than supplied (40mm).
Did a leak test, pumped one litre of fuel from aux tank to a fuel can and then pumped fuel from aux tank to main tank (main tank filler open). All tests OK, and no leaks.
Take special care in routing and securing fuel lines – ensure no kinks in the pipes.
Time taken – two half days, no rush, and no special tools required.
Click here for larger versions of the photos 😉

Update 09Sep2010:
BMW R1200GS Mk.2 Auxiliary Fuel Tank – Modification to Fuel Route
Initially I was unable to source within the UK a common source twin fuel flow valve and had to use the connect/disconnect procedure to transfer fuel from the aux tank to the main tank and then re-connect the vent tube to its normal operating function.
Aircraft Spruce & Speciality CO. www.aircraftspruce.com have supplied a Fuel Flow Valve Twin Tank, Part No. 05-01042 which is the item required to remove the need for connect/disconnect manual actions. Cost of part is $12 plus p&p.
In addition to the use of cable tie-wraps I have used Velcro and self-amalgamating insulating and weather proofing tape which I use for external antennae connections.

Forums: ‘MarkR’
http://www.xrv.org.uk/
http://www.ukgser.com/forums/
http://www.ironbuttuk.org