R1200GS Aeroflow Screen with Saeng Edging
R1200GS Aeroflow Screen with Saeng Edging (not pretty but VERY effective)
by Hari Ahluwalia Jan2007 (revised Mar2012)
Background
The stock R1200GS makes a good tourer. It has excellent ergonomics, an upright riding position, good legroom and ok stock saddle. But the tiny screen so far from the rider creates a lot of noise and quite often turbulence as well which you feel as helmet buffeting. My previous R1100GS had exactly the same issues (except the stock seat was not ok but painfully uncomfortable!). Like many other owners I spent a lot of time and money trying out lots of different screens. I was aided by helpful advice and tips from the BMW-GS email list. Eventually I found the way to get the quiet tourer I wanted, was to fit an Aeroflow screen and add Saeng edging.
So when I bought my R1200GS I went straight out and applied the same Aeroflow/Saeng solution. I am very pleased with the results.

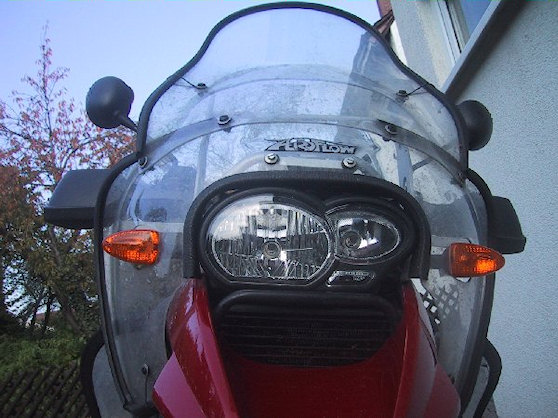
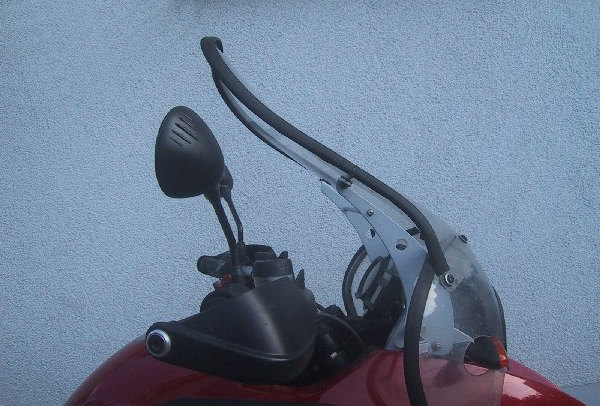
My R1200GS fitted with Aeroflow screen and Aerogards. The black edging is from Saeng TA Corp.
Why bother with Saeng edging?
Aeroflow offer a very effective fairing for the R1200GS which they developed from their successful screens for the previous GS models. Particularly with its optional Aerogards which protect the legs and lower body, it must be the biggest, most effective aftermarket screen available. So why bother with Saeng edging?
That’s a good question and I guess if an Aeroflow screen gives you all you need then you don’t need Saeng. But for me while experimenting I had bought some so I had to try it. I fitted the Saeng edging, rode the bike to compare and it seemed like it made no difference – more money wasted or so I thought. But then, before I got around to taking it off a chance incident changed my mind completely.
It happened on a group ride when I was tail-end charlie. We were riding at a constant 120kph (74mph) or so along a straight section of the German Autobahn with not much wind. I suddenly noticed to my horror that the end of the Saeng was moving and was liable to come off very shortly. I reached forward with my left hand just as it all came off. Fortunately I was able to catch, fold and hold it securely with just my left hand.
All this happened quite quickly but while concentrating on dealing this I had slowed and drifted some 150 yards behind the rider in front. My first thought was that I’d have to pull over and stop but I quickly realised that in fact I could ride fine still with my left holding both the folded Saeng edging and the handlebar. So I accelerated and quickly re-took my place again before the guy in front even noticed I’d slowed.
Now the drama was over I could take stock of the situation. I immediately realised that although I was still sitting comfortably behind my Aeroflow going at the same speed as before along the same straight road with no change in wind, something had changed radically. It felt like someone had ripped my earplugs out – it was now massively noisy!!! It was not a small increase in noise and turbulence, it was overwhelming. Saeng really does reduce noise/turbulence significantly.
So why hadn’t I and others who’d tried adding Saeng edging not reported the same impressive noise reduction with Saeng? That bugged me until I found out that the human ear is not good at making objective comparisons especially over time. Fitting Saeng, going for a ride and trying to hear the difference to before is very difficult. The easiest comparisons to make are immediate – just like the one I’d experienced by accident. Unfortunately that is quite difficult to replicate.
Noise comparisons without instruments are always subjective and unreliable but I found out that on any bike there are two relative noise comparisons you can make.
- The speed at which you can no longer hear the engine.
- Whether noise levels increase or decrease when you stand on the pegs.
The first is strongly affected by both wind speed and direction, i.e. headwind, sidewind or tailwind. The second one is immediate and less subject to wind conditions.
Try it yourself on any bike. When you’re riding at speed, say over 60mph, and it is safe to do so, stand up on the pegs. Your head is now above the airflow generated by the bike and all you hear is the wind. That means the noise level goes down. Riding with your head in the wind is quieter than riding behind any sort of screen because the edges of the screen generate noise.
The only exception I’ve discovered is this Aeroflow/Saeng edging combination. When I ride behind my Aeroflow with Saeng and stand up on my pegs, noise level goes UP! Yes, riding behind Aeroflow/Saeng is quieter than riding with your head in the wind at the same speed. That is a very difficult thing to achieve and is better than BMW manage with their tourers like the R1200RT.
How does Saeng Edging reduce noise?
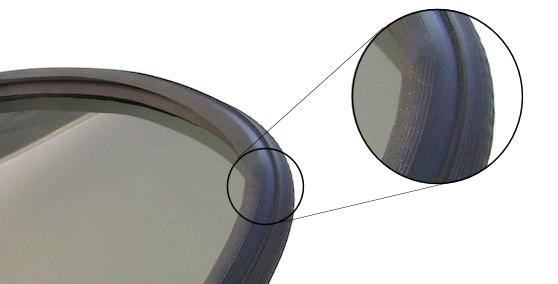
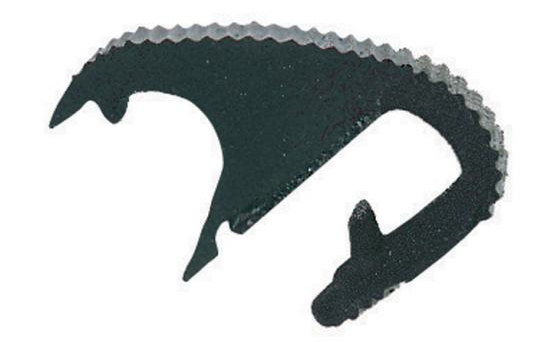
Saeng TA Corp has been developing it’s edging for some time and is now on v3. It was originally developed to edge the screens of open cockpits on bi-planes and similar propeller-driven light aircraft. But it works famously on motorcycle screens as well.

The smooth airflow coming in from the left hits the black Saeng edging and is forced to become turbulent, spinning off top right in tight swirls. Copyright © Saeng TA Corp.


The manufacturer claims that its edging:
- reduces turbulence and noise
- boosts shield coverage by up to 5 inches
- provides a smoother, quieter and more comfortable environment
- slips on quickly yet aggressively grips up to quarter-inch thick material
- works great as a rain guard
- is chemically compatible with all shields.
Saeng edging forces even smooth laminar airflow to become turbulent. And turbulent airflow from the edge of your screen is quieter than laminar. At first that seems counter-intuitive. Surely smooth laminar air is quiter than turbulent air? Well no.
From what I can work out it seems that in this case the source of the noise is the edge of the screen. This noise has to travel from the screen, the distance to your ear.
- If it travels this distance smoothly and undisturbed in laminar airflow the noise arrives pretty much undiminished. So you hear a loud noise.
- On the other hand if the same noise has to travel the same distance but this time along turbulent airflow then it gets chopped up and cut into “micro-swirls”. This reduces the noise level and you hear a much quieter noise.
Purchasing
When buying an Aeroflow you have a choice of three size screens, medium, tall and extra tall. Aeroflow advice on which screen to choose is based on height alone.
The disadvantage of using height only is that people vary a lot in body length. Some have long legs meaning short body length and others have short legs meaning long body length. And it is body length not your height that determines how far your head is above the seat. For example I am 5’11” and should according to Aeroflow require a medium-size screen. However I have now fitted and see over the top of an extra-tall screen.
A simple addition which makes the estimate more accurate is to use Sitting height as I learnt on the BMW-GS email list. Sitting height is a simple way of estimating how tall you are when sitting.
Sitting height = Height – inside leg measurement
So for me, 5’11” with a 31″ inseam that works out as
Sitting height = 71 – 31 = 40″
i.e. an Extra-tall size screen exactly as I found out in practice.
| Screen Size | Aeroflow Advice | Sitting Height |
| Medium | Up to 5’11” | Up to 37″ |
| Tall | Up to 6’3″ | 37-40″ |
| Extra-Tall | 6’4″ and above | 40″ and above |
The ideal size let’s you look just over the Saeng while sitting comfortably. That translates to your eyes being about two inches above the top of the screen when sitting on the bike. Or to put it another way, the bottom of your nose should be about the same height as the top of the screen.
Some people just don’t feel comfortable unless they can see over the screen. But others don’t mind and it also works if you can see through the top of the screen but then you’re more dependent on keeping at least that part of the screen clean.
But even with sitting height, this is still just an estimate. If you’re still not sure which size to take, Aeroflow are very helpful. You can order two different size screens, see which one fits and return the other. They’ll also customize the size e.g. if a screen is taller than you need, work out how much you need to make it ideal for you e.g. 1″ shorter. You can send it back for Aeroflow to cut it down to your requirements. But note they won’t accept a customized screen if you decide to return the whole thing later.
It’s up to you whether you fit Aerogards or not. As you would expect they do make small reductions in both noise and turbulence. So if you are looking for the ultimate then you’ll need them as well.

As regards purchasing Saeng edging I used:
- 5ft on the X-Tall screen
- 2x 1.5ft on the lowers and
- 2x 2ft on the Aerogards
- Total: 12 foot
Installation
Fit the Aeroflow using the comprehensive instructions and installation kit that it comes with. Once the Aeroflow is installed, cut the Saeng edging to the appropriate lengths with a sharp blade. You can see from the pictures that I left a lot of overhang past where the Aeroflow lower meets the screen and also where the Aerogard fits behind the lower. This is not necessary and you can trim the Saeng edging closer for an even better fit.
When fitting dip each length of Saeng edging in warm soapy water to make it more pliable and easier to work with then attach it.

Generally the Saeng edging stays put. But if you want additional security, secure it in place with plastic ties using the following holes.
- On my Extra-tall screen I used the 2 supplied lower mount holes. The lower edge is held in place by squeezing it against the lower screen.
- On the lower screen I used the 2 supplied lower mounting holes. The top holds the Saeng in place by squeezing it behind the top screen.
- On the Aerogards I drilled 2 holes per side, one at the top, one at the bottom.
The plastic is tough but soft so it is easy to file or drill (even with hand tools.) The holes I drilled are about 1.5″ from the edge where the plastic tie fits. (As shown I drilled 3/8″ diameter holes and filled the hole with a blanking grommits. But it’s probably easier to use smaller holes and forget about the grommits).

In practice
The Aeroflow/Saeng combination is pretty easy to live with but there are a few points to be aware of.
- Avoid losing sight of light clusters
In traffic it is all too easy for the black Saeng edging to block your view of the vehicle in front’s light cluster. This means you can’t see their brake lights and indicators – not a good idea! You must keep the lights of the vehicle in front in sight at all times. This requires concentration at first but becomes second nature after a while. - Attach the BMW sidepanels securely
BMW has a just-good-enough design with the front fittings for their sidepanels; there is a press-in at the top and a black plastic quarter-turn fastener at the bottom. The rear two fittings are securely screwed in. It is very difficult to be sure that the bottom front quarter-turn fastener is properly fastened. Without Aerogards, if the fastener drops out the sidepanel stays in place even at speed. However the Aerogards increase the loading on those front fasteners. At 200kph (120mph) a strong sidewind pulled out both front fastenings on one sidepanel and its Aerogard flew off. The rear sidepanel fastenings held just fine so I only lost the Aerogard not the sidepanel. When I told Aeroflow they suggested attaching a short length of fishing line to each Aerogard to avoid future problems. But do double-check that the bottom front quarter-turn fastener is secure (as Aeroflow emphasize in their installation instructions). - Wash with a sponge
The plastic of the Aeroflow screen is soft and scratches easily, far more easily than the stock screen. So never use a scourer on the Aeroflow screen when washing. Instead wash with a sponge or soft brush only. But if you do scratch the Aeroflow screen you can polish out the scratches. Aeroflow supplied me with “Novus 2 Fine Scratch Remover” polishing cream.
I am a track day regular and even use the Aeroflow/Saeng although I take off the the Aerogards. To prove it, here is a shot of me with the Aeroflow/Saeng at the old Nurburgring, Nordschliefe, being held up in the corners by a Suzuki GSX-R1000 (but he left me standing when we both opened up on the next straight!).

I was able to compare top speed on my R1200GS with and without the Aeroflow/Saeng setup in similar wind conditions at the Hockenheimring race track. Without I was 10kph or so faster – so it appears the Aeroflow/Saeng combination overall increases drag while being spectacularly quiet.
One side effect of it being so quiet and still behind the screen is that you become aware of aerodynamic noise created by other vehicles in front. The stock screen creates so much noise that you simply don’t notice the additional noise they create. However this setup has so little noise that you do notice this as a small increase. This increase is not a problem and its size depends on vehicle speed and wind conditions but typically you start to notice an increase some 50m behind a car and 100m behind a truck. The solution is simple – overtake or drop back to a comfortable following distance.
BTW I only ever ride solo so I can’t say how much a passenger would benefit.
Overall I’m very pleased with this setup which is all day comfortable for my head and ears. It’s not cheap and is quite ugly but it’s very still and quiet riding behind it. Put another way, it makes a R1200GS quieter and more protective than a R1200RT while still being cheaper, lighter and more fun to ride!