R1200GS Above Dash GPS / SatNav Mounting Bracket
Probably the best mount you can get is a RAM motorcycle mount, just click the link to see the range. However you might prefer a DIY option.
DIY motorcycle GPS mounting bracket for mounting a Garmin Zumo or a Tom Tom on a BMW R1200GS – adaptable for any GPS mounting cradle.
See also: Garmin Zumo 660 Cradle – Wiring Loom / Cables Modification
MkII DIY Zumo 660 Motorcycle Cradle Mount with Lock
By ukGSer member ‘skyenet’ (original thread here)
Recently I got around to creating my Mark II Zumo GPS mounting for a total outlay of a couple of quid. Mine is made from a flat piece of metal and an angle bracket. Of course if you had the tools and skills you could make a custom bracket in one piece as its quite a simple design.

I aimed on mounting my DIY bracket on my BMW R1200GS Screen mounting frame. There were four possible cutouts that a bolt could be mounted through. Ideally I wanted to mount my bracket using two of these cutouts. I found a flat, thin piece of metal about 100mm long with two holes at either end. I drilled another hole so that it would align with the screen mounting cutouts. I then attached the piece of metal to the screen mounting using two bolts, locking nuts and washers.
This left a hole at the other end of the piece of metal which aligned nicely with an existing hole in a Abru Angle Bracket I had bought at B&Q.

Abru Angle Bracket (L)70mm x (W)70mm x (H)55mm £1.41 from B&Q
The bracket had quite a lot of holes pre-drilled but so to make it less ‘Mecanno looking’ I covered these up with a bit of velcro and some black gaffa tape. I then drilled four holes to align with the Zumo 660 Cradle mounting holes and attached this using some short bolts. I bent the Abru bracket slightly from 90 to 100 degrees to get a better viewing angle.

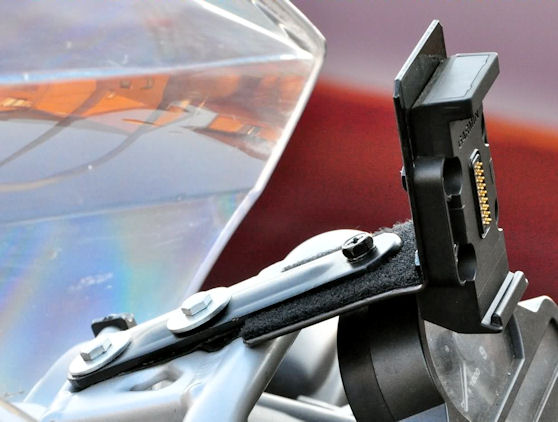
I painted the four bolts/nuts that mounted the Zumo Unit onto my bracket black so that they would blend in better.

The finished bracket is very stable and does not vibrate. I find it is in an excellent viewing position.


I finished off the bracket by drilling a small hole right behind where the Zumo release lever is. This meant that I could attach a small padlock when the Zumo is in situ and this prevents the release lever from being pushed in and so stops the Zumo being removed.

Motorcycle GPS mounting, simple, neat……and cheap! 🙂