HID Headlight Conversion on the R1200GS
Usual disclaimer – mess with your motorcycle electrics, without knowing what you’re doing, at your peril! 🙂
CAUTION: the placement of additional lights or upgrading existing lights may not meet regulations/legislation requirements in some countries.
By Jim Bade (aka Jim VonBaden) (Dec2007)
Based on his orginal post on BMW Sport Touring.com here
After many many promises, I decided to do a short pictorial on how to install a set of HID lights in my BMW R1200GS. This pictorial is done with lots of extra parts removed for clarity. I wont be telling you what tools to use, or torques. This type of pictorial doesn’t lend itself well to it, but you should easily be able to do what I did.

Here are the lights in the box. Mine were the fat ballasts, with the igniters built in. I have done the ones without the ballast built in, and they are definitely easier to mount, though basically in the same place. This is a VME kit that you can get by the truckload from E-bay for under $100 for the two light set. Just search for “HID H7 4300”
The wiring is self contained. You simply unplug the stock bulb and remove it, and then plug the HID wiring to the stock bulb plug, and the other end from the balast to the new HID. NO extra wiring to do.
By the way, this wont work on an R1200ST because both bulbs are on all the time, intensity varried by voltage.

I removed the instruments for the job to make it easier to see, but it is definitely not needed. Here are the High (left) and low (right) covers. Just pop the caps off by twisting them counterclockwise.

Here is a cap before drilling the 23mm hole. I used a Dremmel tool to do mine.

Here is the same cap after removing the material. Interestingly, it is exactly the same size as the indents in the caps. I bet you know why?

Simply push the wires through the hole, then pull the grommet in place. They recommend adding some sealant, but I didn’t. I figure they will seal just fine as is.

Here are both of them mounted. The wiring looks clean and secure in the caps.
The wires are coming out at a slight angle, but the bulb is in tight. The wires do not connect directly to the bulb via a connector but instead have a little bit of slack within the housing. The bulb is in flush and straight.

Here is the right ballast mount. You can see it went to the screw holding the oil line.

This is the other mount, shown to illustrate the original shape. I bent it with pliars.

Now you can see it is a tight fit with the beak installed. But it is clean. I added some tie straps to secure the ballast to the mount, and firm it in place as well.

The right ballast fitted in, and cleanly. With everything put back together, and the wiring secured, it is nearly invisible.

On the left side, the ballast goes into the same place. It is a tight fit, and you will have to play with it a bit, but it will fit. The slimmer ballast would have the advantage here.
Now lets take a look at the results:

Low HID. Clean white, but not too blue. This is the 4300 kit.
I then added a second GS, with Motolights, and compared them side-by-side.
Note that the bike on the left is completely stock with 35 watt Motolights. My bike has both HIDs, and 50 watt Motolights.

Low beam, you can see the difference here.


High beam, even more obvious.
PS The carpet came with the house, and it really is nice to work on it instead of cold concrete!


Both bikes with Motolights and High Beams.
It seems obvious to me, especially after riding at night, that the HID lights are definitely superior, and not as susceptible to dimming at idle with Gerbings and Servos going.

Here is what the bulb looks like installed in the low beam.

Don’t forget to keep the old H7 bulbs, just in case. This procedure is completely reversible, and if an HID goes out, you can swap in the old H& in minutes.
Jim
——————–
A couple of days later:
Kermit came over tonight and showed off his newly colored Hella FF50 Lights. I thought it a good opportunity to compare lights on each bike so the following is my demo on my garage door.

HID Low beam only

Stock Low beam only

HID Low and High beam

Stock Low Beam (Note, Kermit has removed the cover on the tip of the bulb for better light).

Kermit’s “yellow” FF50, painted with craft store spray stained glass window paint.

HID (left) and stock, both High Beams, with yellow FF50s on the right.
As you can see the beam for the HID light is slightly more scattered, mostly horizontally, but has a very similar line and height. I am very confident that the HID wont be blinding.

This is an example of a cold flash to pass. The High Beam HID was dead cold, and I flicked it on. When warm from recent use, it is VERY much brighter on Flash to Pass mode.
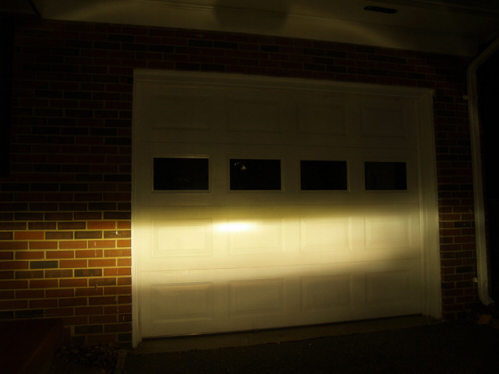
Also, for those concerned about excessive flood of light outside of the beam pattern, here is what you get:

Virtually identical to the stock amount of scattered light.
Jim
PS Just a note, these are unretouched photos, and the camera made some adjustments based on the amount of light. The HID lights were significantly brighter than the pictures showed, but if you look at this picture:

You can get a better feel for the differences.
——————–
Click here to order the R1200 and R1100/1150 Maintenance and Accessories Video DVDs
——————–