Suspension Setup Notes
By AndyW
| AndyW – usual warning, refer to manufacturers workshop manual. |
Suspension Setup Notes based on an article I did for my K3 Suzuki SV1000 but the principles are the same for any motorcycle although the position and type of adjusters may vary (NB some bikes do not have fully adjustable suspension and settings quoted refer to the SV1000 – refer to your motorbike handbook / manual!)
(print this page and enter your settings/measurements in the boxes provided)
| Fork Height Adjustment Use a steel rule or Vernier Gauge to measure the amount of the fork tube showing through the clamp to the bottom edge of the fork tube cap |
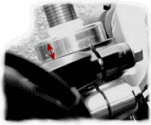
Forks raised through yokes by mm Fork tube showing mm
Front Sag
Suggested measuring points – top of fork dust seal to bottom of lower fork triple clamp.
Measurements:
1) Raise front of bike until suspension tops out
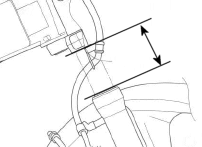
2) Bike in an upright position (i.e. not on stand) unladen
3) As for (2) but with rider + riding gear
(1) – (2) = Static Sag
mm
(1) – (3) = Laden Sag
mm
CARE: Work the suspension several times between measurements to ensure natural resting position found.
Front Pre-load
The most accurate method is to measure the distance A with a steel rule or Vernier Gauge (allowing for more accurate adjustment and ensuring balance of the two forks)
Otherwise count ‘rings’ B visible i.e. flush with and above the Fork Cap nut – the setting shown in the diagram is 8 rings
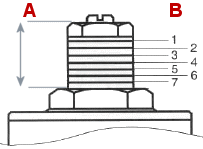
Ring 6 flush with Fork Cap nut top = factory setting
Ring 1 flush with Fork Cap nut top = max preload
Ring 8 flush with Fork Cap nut top = min preload
Front Rebound & Compression Damping
Rebound: Fully turn the adjuster screw (1) clockwise counting rotations (use the markings on the top of the pre-load adjuster for accuracy) until it seats fully closed (max rebound damping) – turn anti-clockwise to reset or set new setting
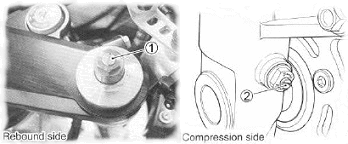
Factory settings:
(1) = 1 turn out (2) = 1 turns out
(UK handbook states ¾ & 1 respectively!!)
Rebound Compression
Compression: Fully turn the adjuster screw (2) clockwise counting rotations etc (same process as for rebound)
CARE – Do not over-tighten the adjuster screws as damage may occur to the adjuster’s seal
Rear Sag
Suggested measuring points – remove the pillion seat and place a wooden batten across the top of the two helmet hooks: hook your tape measure under the chain tensioner bolt and measure to the lower edge of the batten
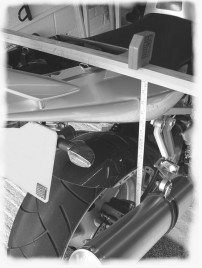

Measurements:
1) Raise rear of bike until suspension tops out
2) Bike in an upright position (i.e. not on stand) unladen
3) As for (2) but with rider + riding gear
CARE: Work the suspension several times between measurements to ensure natural resting position found.
(1) – (2) = Static Sag
mm
(1) – (3) = Laden Sag
mm
Rear Pre-load
The most favoured measurement appears to be B (thread showing above the adjuster locking ring)…
however the workshop manual uses measurement A (underside of adjuster ring to mid-point of the casting that supports the spring)
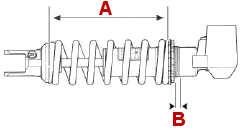
A = 199.5mm = factory setting
A = 194.5mm = max pre-load
A = 204.5mm = min pre-load
A B
Rear Rebound & Compression Damping
Exactly the same process as adjusting the front
Rebound adjuster (1) at the bottom of the damper and
Compression adjuster (2) at the top
Factory settings:
(1) = ¾ turn out (2) = 2¼ turns out
Rebound Compression