Creating GPS encoded photographs
– for free!
See also: Geotagging Photos using a Garmin Zumo
Below you’ll find a great article by a local and fellow GS rider Mike Belch on how to create your own GPS encoded photographs for free using your existing SatNav GPS system (Garmin 2610, Zumo 550, TomTom Rider or whatever) and software freely available for download. I’ve added a few extra relevant links at the bottom of the page.
Something else interesting to do with your GPS / SatNav system:
GPS Drawing – use your GPS tracks to create large-scale drawings (and BMW GPS Drawing challenge)
Geo Photography, GPS Photography, GeoTagging, all are used to describe one of the most useful and innovative photography enhancements available. Add an extra dimension to your photographs by Geotagging them. You can even GeoTag your photos even if you don’t own a SatNav system or GPS datalogger [more]
See also: GPS, PhotoMapper & Google Earth
Author: ‘Cheesy Mike’ GSclubUK 02Oct/2007
View thread for additional comments:
Make your own Egbert (creating GPS encoded photographs for free) (external link)
Mike O’s new toy ‘Egbert’ the GiSTEQ PhotoTrackr allows him to produce photographs from his digital camera containing latitude/longitude coordinates showing exactly where the photo was taken. This article is intended to explain how you can do the same using nothing more than your regular GPS and some free software.
The principle is really simple – Egbert (and GPS devices like it) log its exact location and a timestamp into memory every 10-30 seconds. Digital cameras also record the time at which an image is taken as part of the EXIF data in the JPEG digital picture. The software provided with Egbert takes the timestamps in the GPS track points and the digital image timestamps, finds a match and then encodes the latitude/longitude from the GPS track point into the JPEG image. This process is known as geotagging. What is neat about Egbert is that it is very small – about the size of a matchbox – and very simple to use (which is why it appeals to Mike O :-). Its small size and lack of display means it uses very little power so a full charge should last 1.5 days or so of continuous use.
With your geotagged images you can do very nice things like load them into Google Earth or submit them to geographically-aware photo sites such as Panoramio, Flickr, the UK Geograph project or SmugMug. SmugMug automatically recognises geotagged photos in a folder and displays a little “Map This” icon which will show the photos in SmugMaps – a version of Google Maps. Once you have geographically encoded photos you can then produce some great write-ups of your on-road or offroad trip e.g. by doing the writeup as normal, complete with photos but then attach the Google Earth .KMZ file complete with GPS track and photos showing exactly where each one was taken. |
Unlimited photo storage and sharing – FREE Trial of SmugMug
When signing up for SmugMug enter the following code for a discount! 🙂
xaLmW3ktAuOOM
You can however produce your own geotagged photos using your regular GPS and some freely available software. Most, if not all, GPS systems keep a track log. On some it is an option that you may need to enable, so check your setup menus. One possible disadvantage that some regular GPS devices have over Egbert-like devices is that they tend to record the track log less frequently. This can mean that an exact location may not have been recorded at the moment that you took a picture. In practice I have found this not to be a huge problem though. Check to see if your GPS SatNav system allows for adjustment of the frequency at which track points are recorded.
king pictures First ensure that your GPS and camera are set to the same time. A GPS receiver locked to a satellite is one of the most accurate clocks that you can get. Use the time displayed on your GPS to set the camera’s time. Ensure that the date is also set.
Now you simply go out and take pictures. Obviously you need to make sure that your GPS is turned on and tracking your location.
Software setup
To get started you will need a couple of pieces of free software. The first enables you to get the track log off your GPS and into a format easily understood. The second does the timestamp comparison and lat/long encoding into the JPEG picture file.
To get your GPS log use free software such as EasyGPS. This will connect to your GPS and save the track log into GPX or NMEA format. If you have some other format of track log from your GPS software then simply Google on how to convert it to GPX format. It should be straightforward as GPX is a popular XML based format.
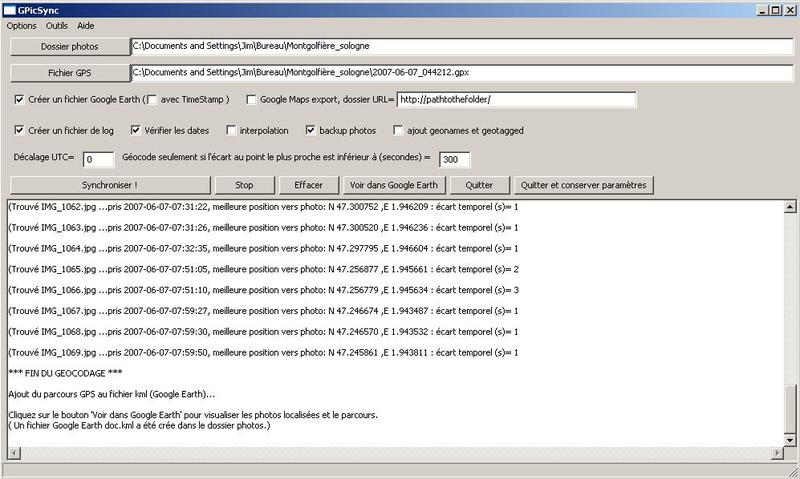
To match GPS log to photos you need to use GPicSync. There is a very useful getting started page for GPicSync. At its simplest you point GPicSync at your GPX track log file and you point it at the directory containing the digital pictures. Assuming your camera and GPS are set to the same time it will do the comparison and encode the lat/long coords into the photos. If you don’t have the correct time set then you can tweak the software using the software’s “Options –> Local time” correction feature and enter the time displayed by your GPS and camera. This will allow the software to get a better match of location to picture.
Using the encoded photos
So now you have a directory of geotagged pictures what do you do next? Within GPicSync you can simply click the “View in Google Earth” button. For your own amusement and benefit this is rather cool. You can also generate a KML file (what Google Earth uses) that you can share with others. You can upload a geographically encoded photo into a number of other sites (as listed above). If you have Google’s Picasa photo imaging software installed on your PC then you can highlight any number of photos in a folder and again display them in Google Earth. Picasa automatically detects a picture with coordinates and displays a little cross icon in the bottom right side of the picture. (Comment=AndyW: Picasa is one of the applications you can choose from Google Pack, Picasa in particular is brilliant)

I had some good success playing with my Magellan SportTrak Map which I carried in my pocket as I took the dogs for a walk. As previously mentioned Egbert would have been better as it records track points more frequently and is physically tiny but I was still pleased with the results I got from and old GPS that has been sat unused in my motorcycle panniers for the past couple of years. You may even be able to do this with old digital photos as some GPS receivers keep huge tracklogs in memory so a past trip/ride where you took photos might already be logged.
I have attached a sample Google Earth KMZ file generated from Picasa which shows a short walk that me and Mrs Cheesy took around a local forest at the weekend. The sharp eyed may notice that the date stamp on the photos says 2006. This is because I am a numpty and set the camera to the right time, right day, wrong year. Some hacking was necessary to get a GPS track from 2007 to match up with pictures from 2006! Dowloand Google Earth KMZ file (263kb)
Geographic encoding without a GPS
Even if you don’t have a GPS, you can still geotag your photos. Google’s Picasa software has a very neat feature accessed by “Tools –> Geotag –> Geotag using Google Earth”. This will launch Google Earth then display any photos that you chosen and allow you to drag the map around, zoom into a location then simply click “Geotag” to encode the coordinates into the photograph. It allows you to do this for just one picture or a whole series. Very nice.
You can also Geotag with SmugMug. Simply select a photograph, click the “Photo Tools” drop-down menu and choose “Edit Geography”. This will present you with a screen which allows you to choose an address or enter the coordinates directly. If you don’t know the coordinates simply type the name of the town (and country if applicable, as this is a global tool) into the address field. This will give you the familiar Google Maps interface, so you can pan/zoom in map/satellite/hybrid mode until you find the exact location where your photograph was taken. Be sure to double click on the map to set the location of the SmugMug icon, then click “Submit”. The minor downside that I have seen with this approach is that you can only Geotag one photo at a time – which could be time consuming if you have lots to tag. For bulk encoding I would recommend Picasa.
Get Google Earth and Picasa: www.google.com/about/products
Feel free to ask if you have any questions. And do heed this one bit of advice: Try it out first – even if you just take a photo in your back garden. It is easy to make mistakes the first time you try this and it would be a shame to lose the data from a whole trip because you had something setup wrong.
It is probably worth noting that there is other free software available to achieve the same thing as GPicSync – useful if you have a Mac, for example. Info about the software available can be found on the Wikipedia Geocoded photograph article.
Another good source if you want to dive deeper into the realm of Geotagging is the geobloggers website. But frankly that’s bordering on sad an obsessive
Links:
If you’re interested in buying a GPS Data Logger try Google searches for alternative to the GiSTEQ PhotoTrackr e.g. the GLOBALSAT DG100 GPS DATA LOGGER
http://en.wikipedia.org/wiki/Geocoded_photograph
Picasa – how do I Geotag my photos?